Contents
Evolution of Machine Learning, from Server to the Edge
Traditionally, Machine Learning (ML) and Deep Learning (DL) models were implemented within an application in a server-client fashion way. The server provided training and inference capabilities by exposing web APIs of any sort (REST, web-socket, PUB/SUB, etc…) while the client was used mainly to exchange data with the server and present the inference result to the user. Whilst this approach has been proven to work well in many cases, it involves a lot of Input/Output (I/O) and a subsequent slowdown of the application.
However, in recent years, the concept of moving DL models to the client-side has emerged, which is, in most cases, referred to as the EDGE of the system. This approach has been made possible by the newest advancement in GPU/mobile technologies, like the NVIDIA Jetson microcomputer, and by the introduction and support of ML frameworks for EDGE devices, like TensorFlow Lite and TensorFlow.js.

Due to this exciting new development in machine learning and deep learning, we figured it would be interesting to show you how you can use Tensorflow.js and a pretrained model called PoseNet to create new possibilities for real-time, human-computer interaction that takes on a Kinect-like style. So, in this article, you’ll find a simple tutorial for applying ML to your project, (even if for the first time) and some use cases for it so you can gain a better understanding of why you would want to apply this technology.
Introducing Tensorflow.js: the brain for your smart apps
![]()
TensorFlow.js is the JavaScript version of the popular machine learning framework released for Python by Google in 2015. TensorFlow provides an environment that facilitates the development of complex statistical models by exposing an API composed of high-level abstractions of the nuts and bolts (activation and loss functions, graphs data-flow, tensor operations, etc.) of a Machine Learning/Deep Learning model and by leveraging the power of GPU parallel computing.
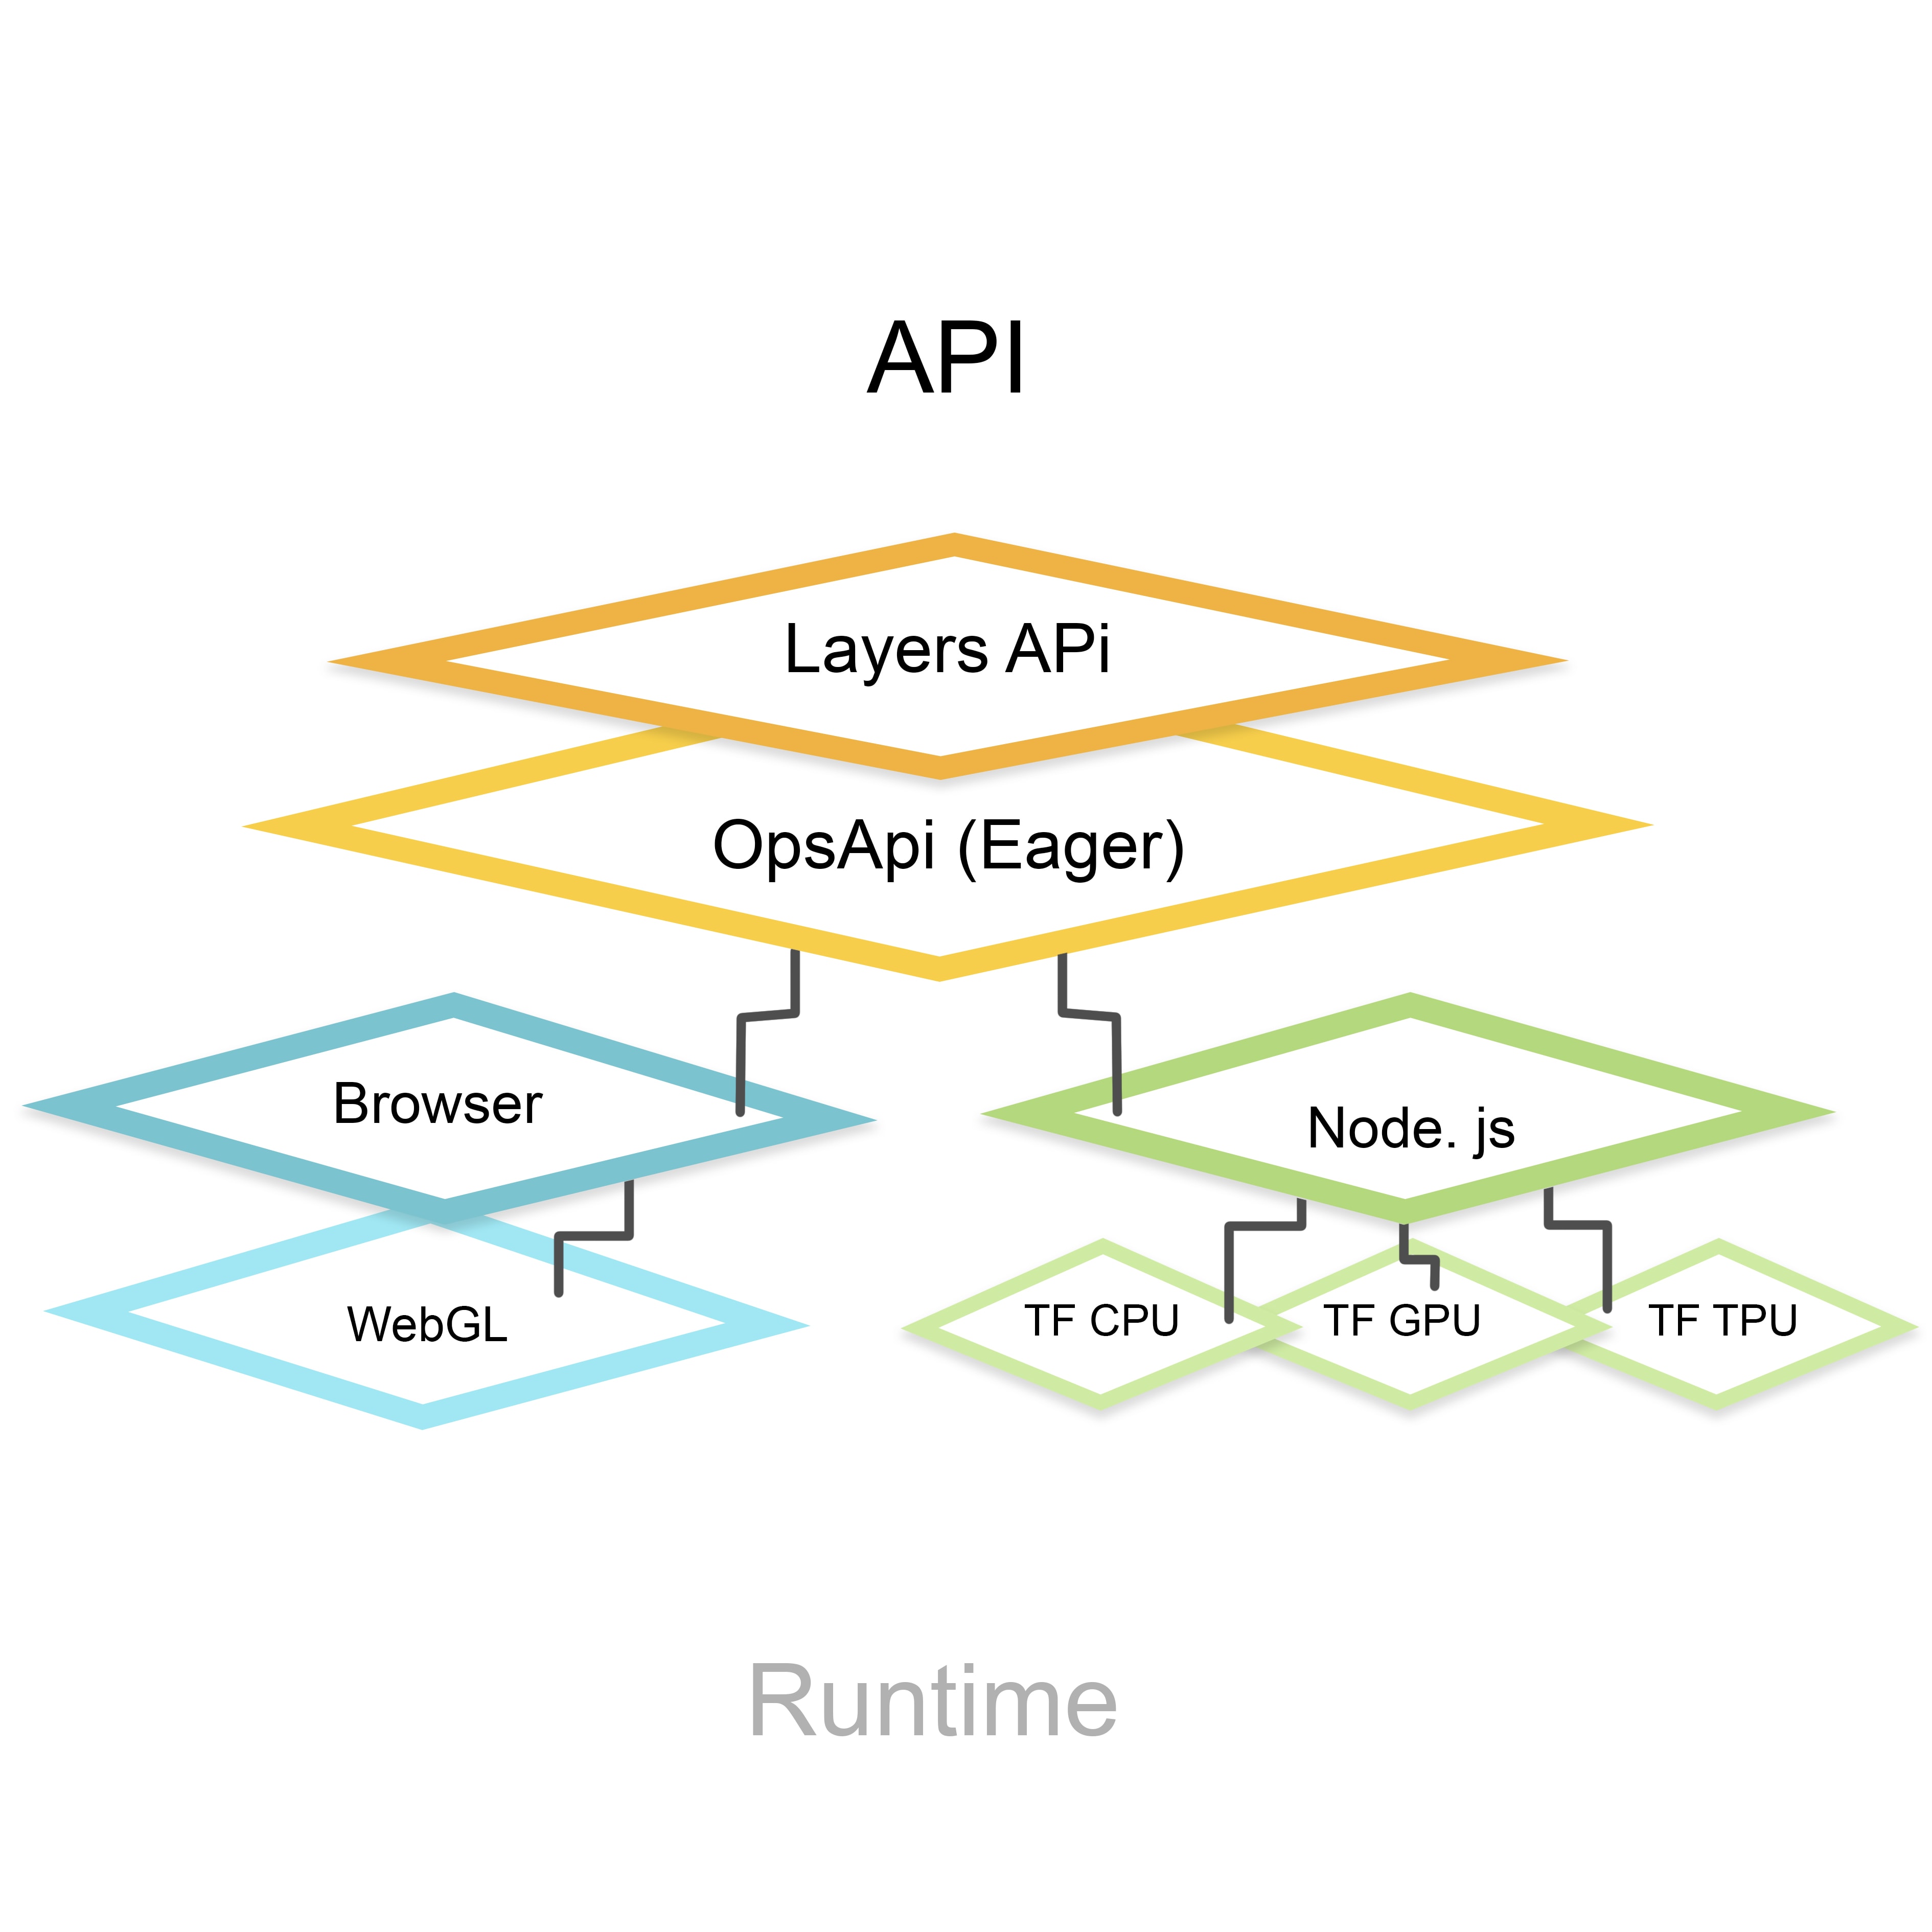
Thanks to the WebGL, API TensorFlow.js can leverage the power of the GPU even in the browser, allowing us to run complex deep learning models for training and inference. The following picture represents the architecture of the framework. Most of the time, the user will access the Layers API (high-level abstraction) while the Ops API provides low-level linear algebra operations.
How to use Tensorflow.js models
If you’re interested in applying machine learning to your app, the easiest way to do so is to include one of the pre-trained models for Tensorflow.js published on NPM under the scope, @tensorflow-models. Those models come pre-trained and can be included in any JS application like a JS module.
In order to illustrate this, in this post we are going to show a concrete example. PoseNET is a machine learning model that allows human pose estimation in real-time. We refer to human estimation as the ability to identify human figures and the relative key body joints and parts. Let’s dive into the code to understand a bit more about what we can achieve with this model.
|
1 2 3 4 5 6 7 8 9 10 11 12 13 14 15 16 17 18 19 20 21 22 23 24 25 26 27 28 29 30 31 32 33 34 35 36 37 38 39 40 41 42 43 44 45 46 47 48 49 50 51 52 53 54 55 56 57 |
## create a directory and initialise the project mkdir fun-with-posenet && cd fun-with-posenet ## Install the live-server module (used to spin-up a webserver) npm i –g live-server # create a file called index.html and add the following piece of code # add an image to the project directory called myImage.jpg <!-- index.html file start--> <img id=”myImage” src=”myImage.jpg”/> <script src="https://unpkg.com/@tensorflow/tfjs"></script> <script src="https://unpkg.com/@tensorflow-models/posenet"></script> <script type="text/javascript"> // loading the network posenet.load() .then(net => { // posenet model loaded, now we get the DOM element with the // image or video and we return a single pose estimation const imgElem = document.getElementById(“myImage”) return net.estimateSinglePose(imgElem) }) .then(console.log) // print the pose estimation, if any to console </script> <!--index.html file end--> # serve the index file using live-server live-server |
As we can see from the code above, the actual implementation and usage of this model is very straight-forward and can be done with just 10 lines of code.
The single pose estimation will return a JS object with the following parameters:
- Score – a probability value that can be used to discard wrong estimations, in our case we used a threshold value of 0.3
- Keypoints – a list of key-points with their name, score, and coordinates
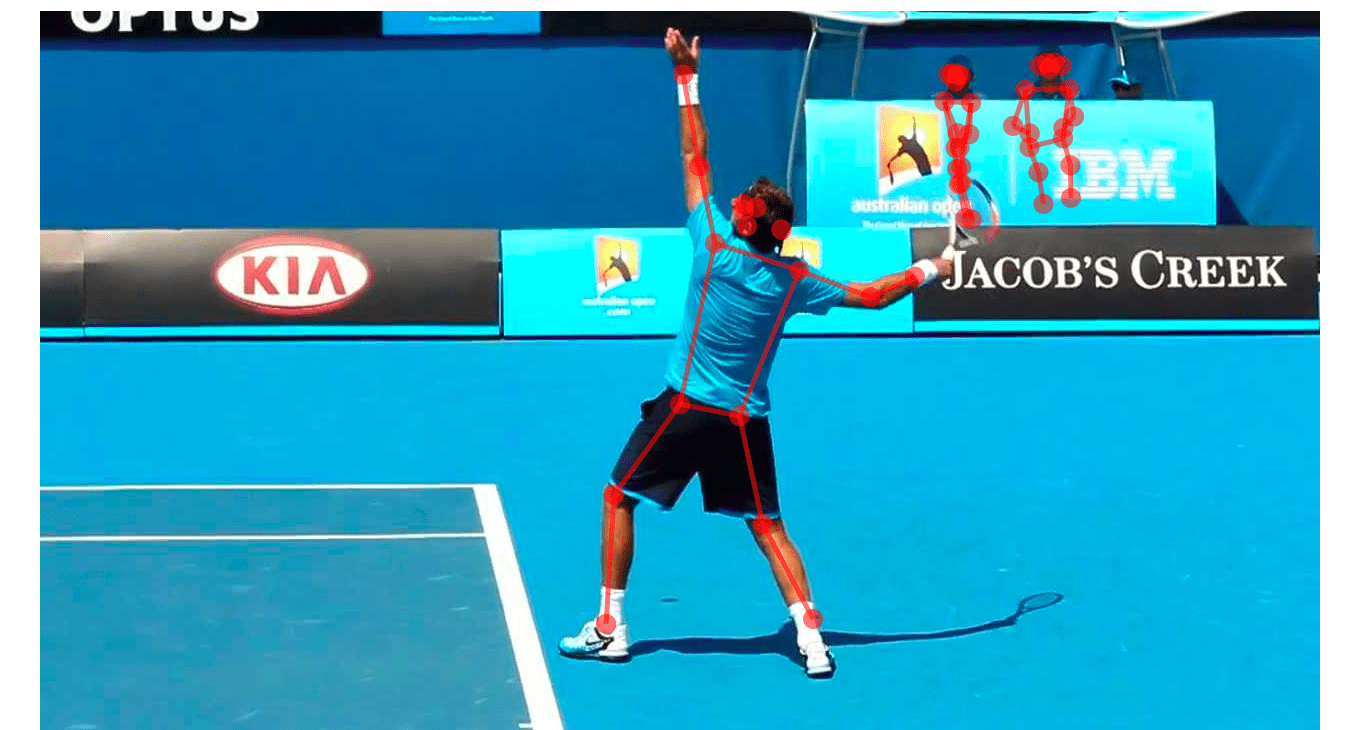
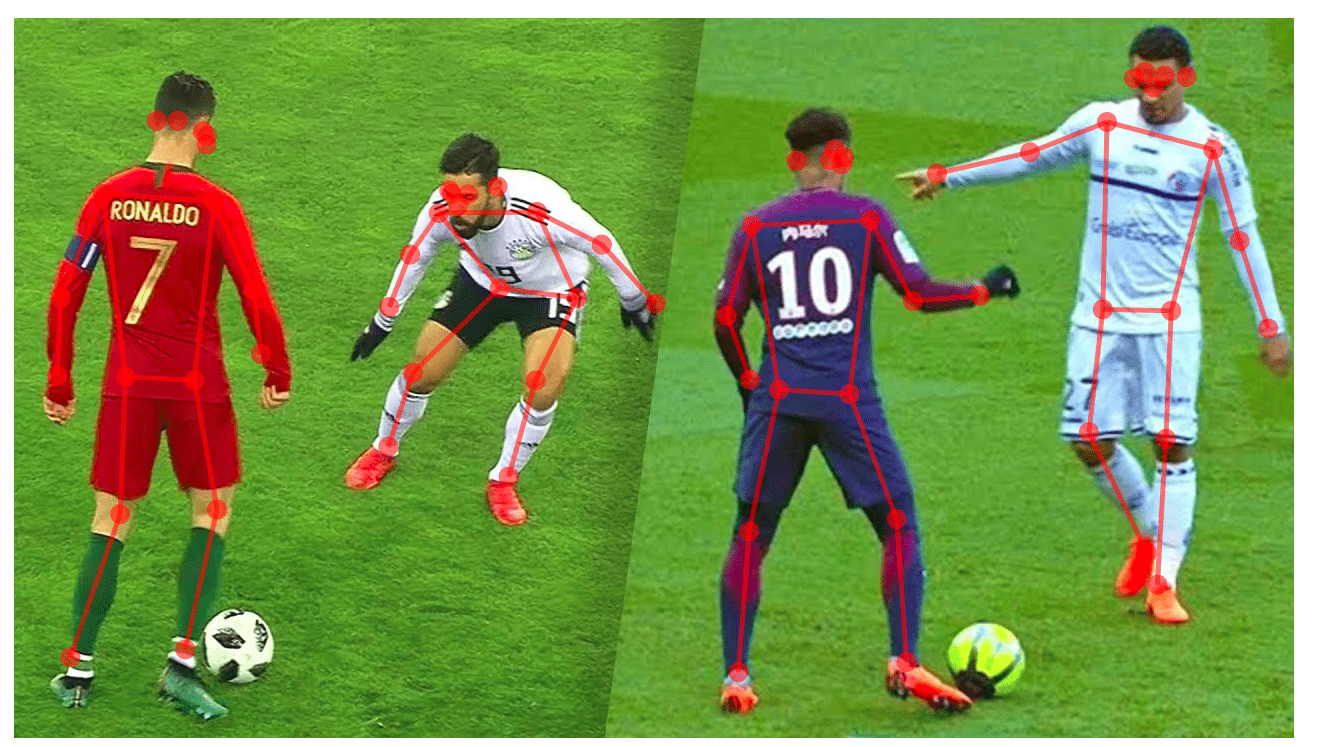
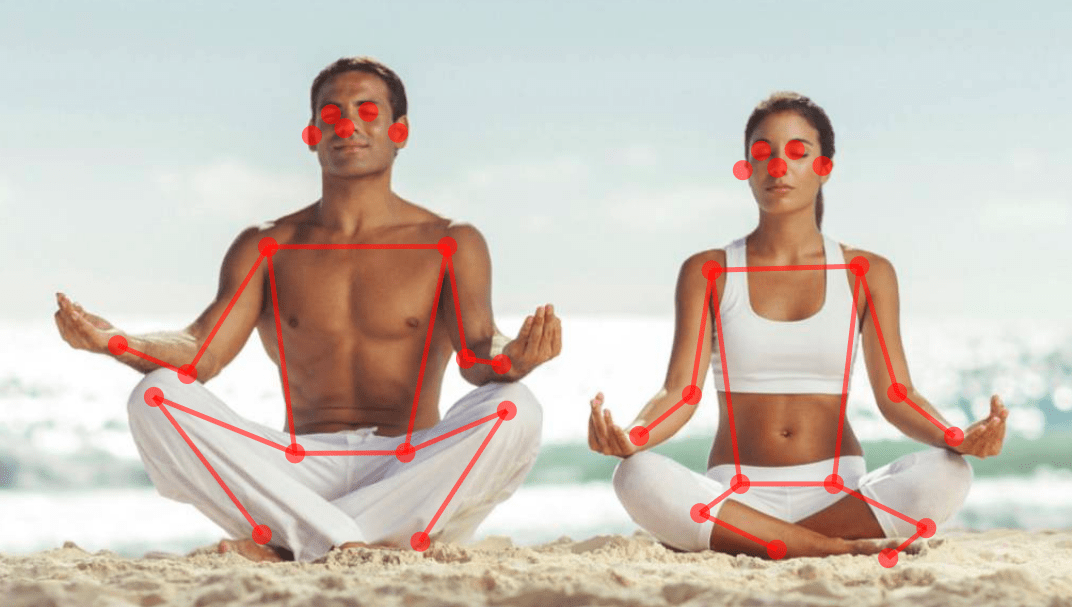
Using the key-points provided, it will be possible to draw the estimated pose in an overlaying canvas, like the pictures below.
Using poseNET model to analyze video streams
Since the estimateSinglePose method takes a DOM image or video element as input, applying the same method to a webcam stream or to a video stream, is painless. You just need to execute the estimation for every frame, or every n number of milliseconds, which can be done using the setInterval or the requestAnimationFrame functions provided by the JS language.
The following is an example of how to start the webcam feed and how to estimate every frame. Here is a small video of poseNET running on a MP4 video:
|
1 2 3 4 5 6 7 8 9 10 11 12 13 14 15 16 17 18 19 20 21 22 23 24 25 26 27 28 29 30 31 32 33 34 35 36 37 38 39 40 41 42 43 44 45 46 47 48 49 50 51 52 53 54 55 56 57 58 59 60 61 62 63 64 65 66 67 68 69 70 71 72 73 |
import * as posenet from "@tensorflow-models/posenet"; const videoElem = document.getElementById("video"); videoElem.height = 600; videoElem.width = 600; // get camera access return navigator.mediaDevices .getUserMedia({ audio: false, video: { height: videoElem.height, width: videoElem.width} }) .then(stream => { // bind the stream to the videoElem and play videoElem.srcObject = stream; videoElem.play(); // load the psoenet model return posenet.load({ architecture: "MobileNetV1", outputStride: 16, inputResolution: 257, multiplier: 0.75 }); }) .then(net => { // start a "game loop" that will estimate a pose from the videoElem // every 500 milliseconds setInterval(async () => { const pose = await net.estimateSinglePose(videoElem, { flipHorizontal: true }); // discard the pose if score is less than .3 if (pose.score < 0.3) return; console.log(pose); }, 500); }) .catch(err0r => { console.error(`error during startVideo: ${err0r.message}`); }); |
PoseNET use cases and alternatives
Generally speaking, moving ML and DL models to the EDGE improve the perceived performance of an application and increases the overall security and privacy as the client-side won’t need to exchange the raw data with the server, but only the representation of this data in the form of weights.
In the specific case of PoseNET, we could use the model to provide an enhanced user experience by adding another level of interaction within the application. As an example, here at UruIT, we created a simple volley game where the user can bounce a virtual ball on the screen using Matter.js as the physics engine and the webcam stream combined with poseNET’s estimation of the eyes’ key-points.
The same approach could be used in many different ways. An interesting example could be a web application for a sunglasses company, where the user can virtually try on its sunglasses and see how they fit in real-time.
Another app that could be made with the same method is a fitness app that helps you practice yoga by giving you advice on your poses. It could also be gamified by awarding users points when they achieve and maintain a pose for a certain amount of time.
PoseNET alternatives and more pre-trained models
PoseNET is just one of the many deep learning models that are going to be released in the near future.
The following are some of the notable ones already published by Google and by other Open-Source contributors:
- COCO-SSD (image classification) COCO-SSD on npm
- Toxicity (text classification, sentiment analysis) Toxicity on npm
- Face-api.js (face detection, face recognition) Face-api.js on npm
- Handtrack.js (hand tracking) Handtrack.js on npm
How does poseNET work?
In this section, we’ll discuss how the poseNET model works under the hood. To keep things brief, we’ll assume that you have basic knowledge of linear algebra and knowledge of how Machine Learning and Deep Learning models are defined. If you need a gentle introduction on ML and DL, you can start by reading our Ultimate Introduction to Machine Learning.
The poseNET model is based on the PersonLab paper and it’s been built on top of the “MobileNet” architecture which is a type of Convolutional Neural Network used in computer vision applications and optimized to run on mobile and embedded systems.
The provided model has been trained and evaluated against the Microsoft COCO dataset which comprises 330k total images and 250k people with key-points.
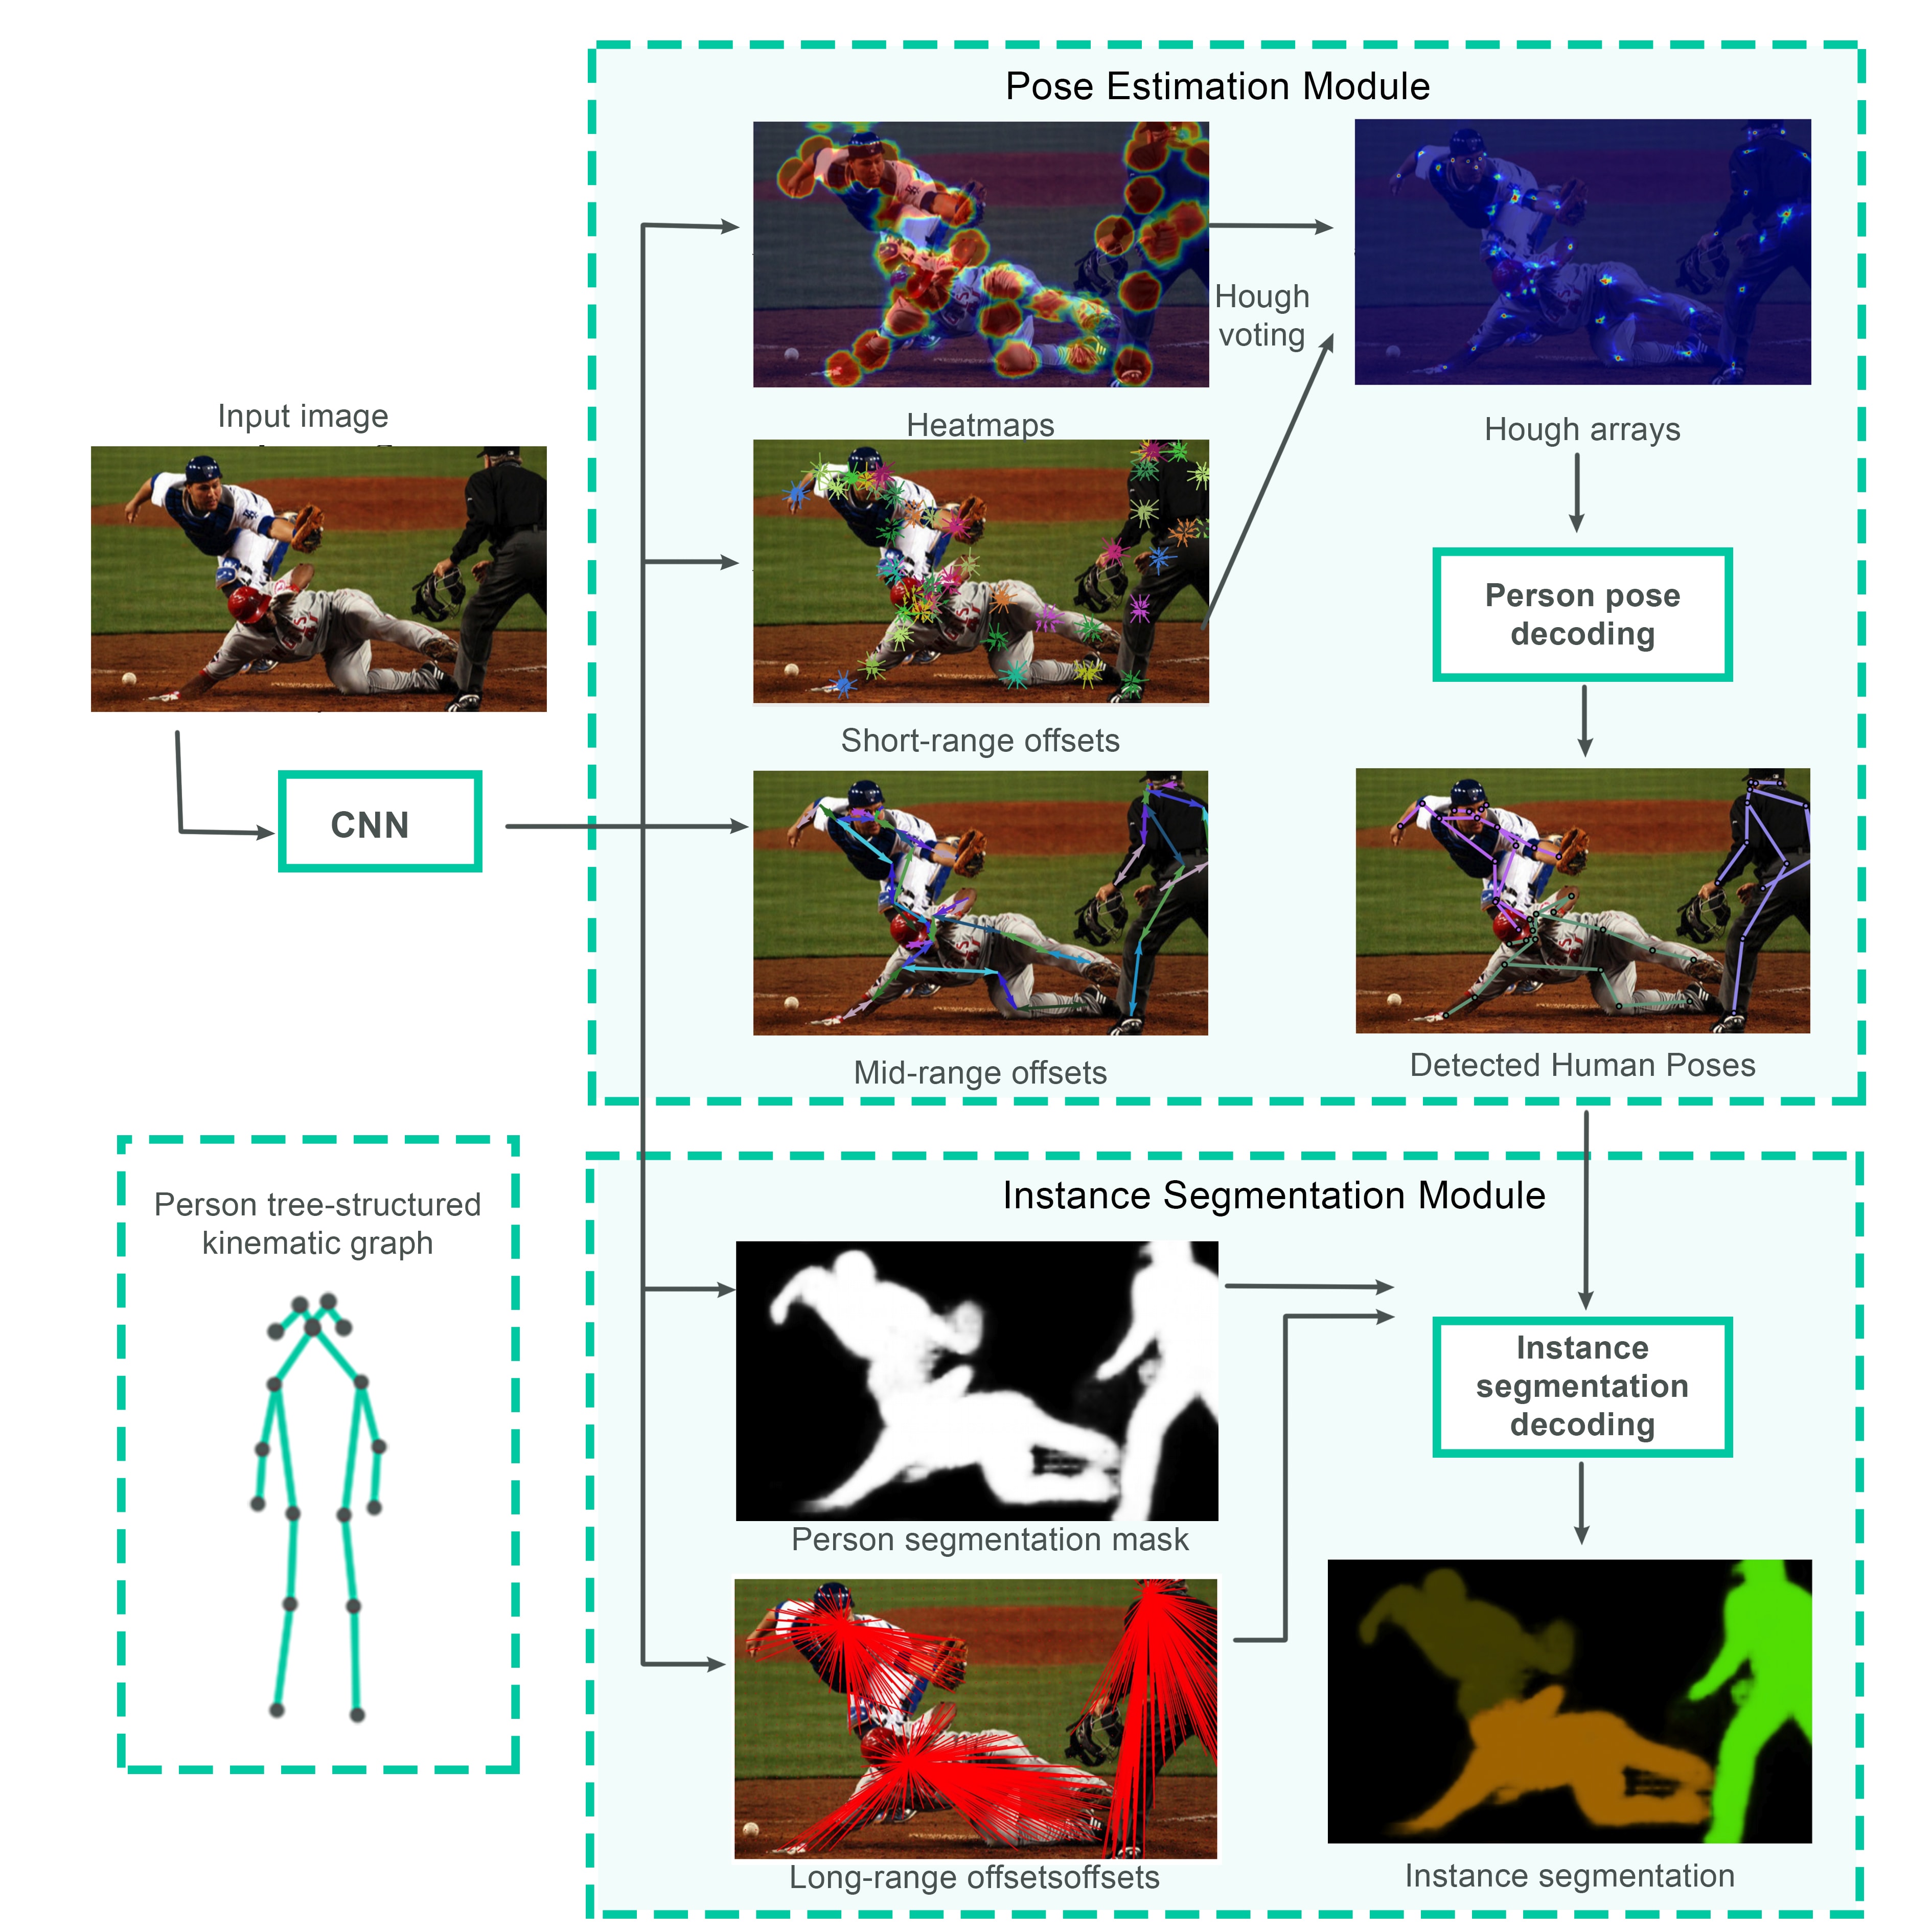
The diagram above describes the components of the model that takes a raw image as input and feeds that into a Convolutional Neural Network (MobileNet or ResNet). The output of the latter is then used to produce the poseNet outputs in the form of heatmaps and offset vectors.
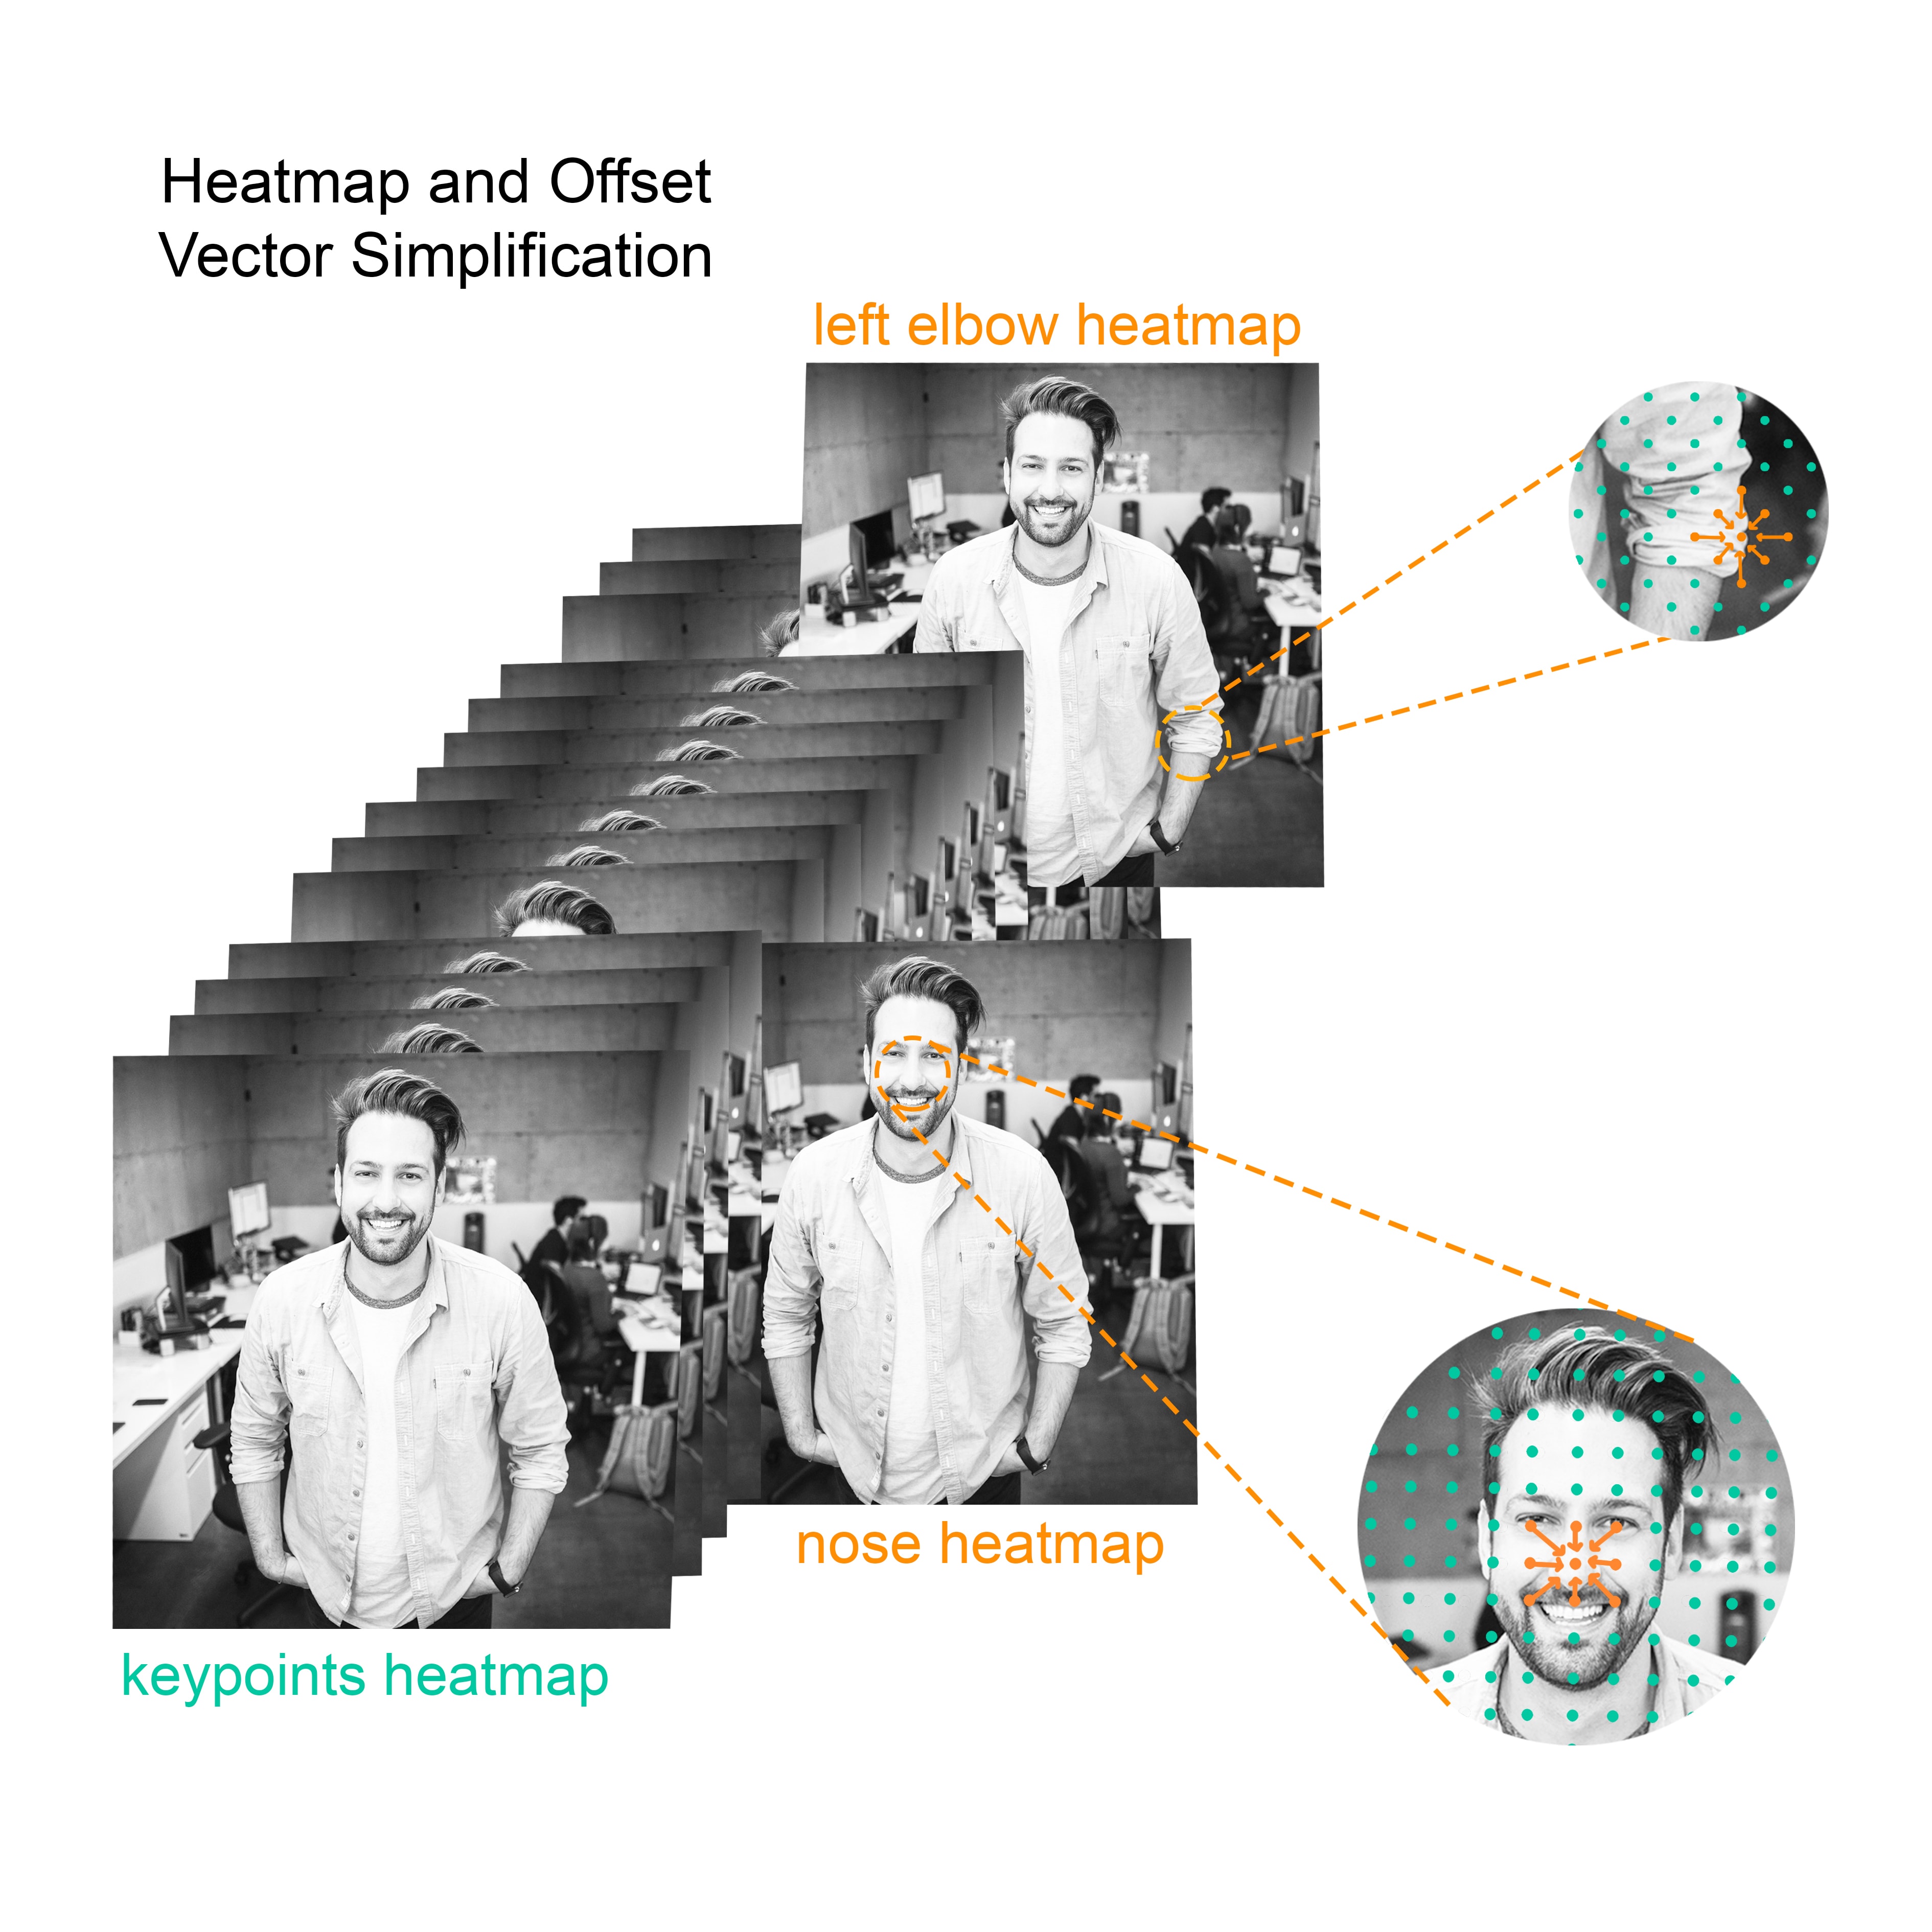
Heatmaps are represented internally by a 3D tensor of shape (Xres/outputStride, Yres/outputStride, Kn) where Xres and Yres are the resolution of the image and Kn is the number of keypoints. In the case of the PoseNET model, the resolution depends on the chosen outputStride that defines the segmentation of the image. Given an image sized 255×255 pixels, an outputStride of 16 and 17 keypoints, the heatmap tensor will be of the shape (15, 15, 17).
Offset-vectors are used along with heatmaps to predict the exact location of the keypoints. While the PersonLab paper provides a better description of the different offset vectors (short, mid and long-range), in this article, we limit the analysis to the short-range vectors for simplicity’s sake, but adding more off-set vectors would provide better precision in the pose estimation and Instance segmentation. Short-range offset vectors are represented as 3D tensors of shape (Xres/outputStride, Yres/outputStride, Kn*2).
After retrieving the Heatmaps and Off-set vectors, we can calculate the keypoints as shown in the following code:
|
1 2 3 4 5 6 7 8 9 |
Scores = heatmap.sigmoid() HeatmapPosition = scores.argmax(x, y) OffsetVector = [offsets.get(y,x,k), offsets.get(y,x,k*2)] KeypointPositions = heatmapPositions * outputStride + offsetVectors PoseScore = mean(Scores) |
Summary
In this article, we saw that implementing a pre-trained model in a web application using TensorFlow.js is an easy task that can be done with just 10 lines of code. This opens up new levels of Human-Computer Interaction (HCI). Also, it brings new tools to UX designers to enhance the overall UX of an application.
Feel free to share this post with your network! We’re happy to collaborate with other developers and tech teams.